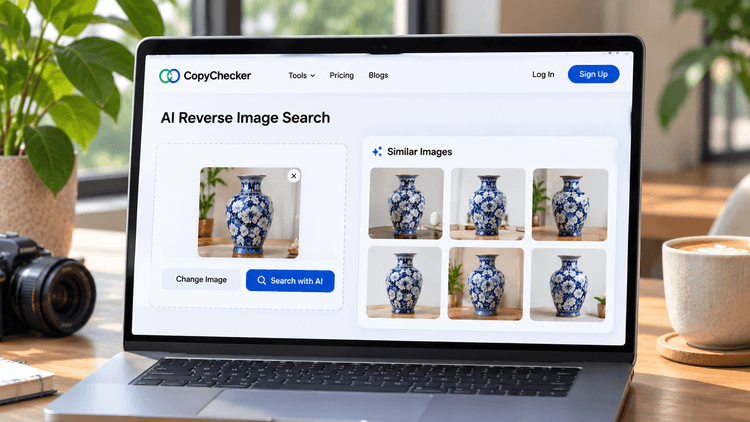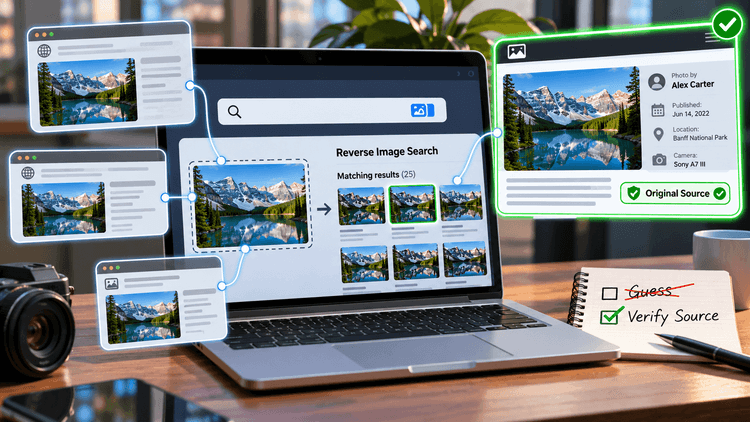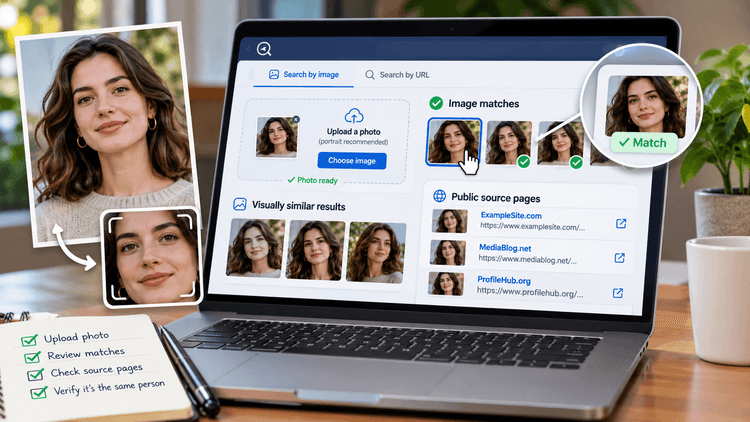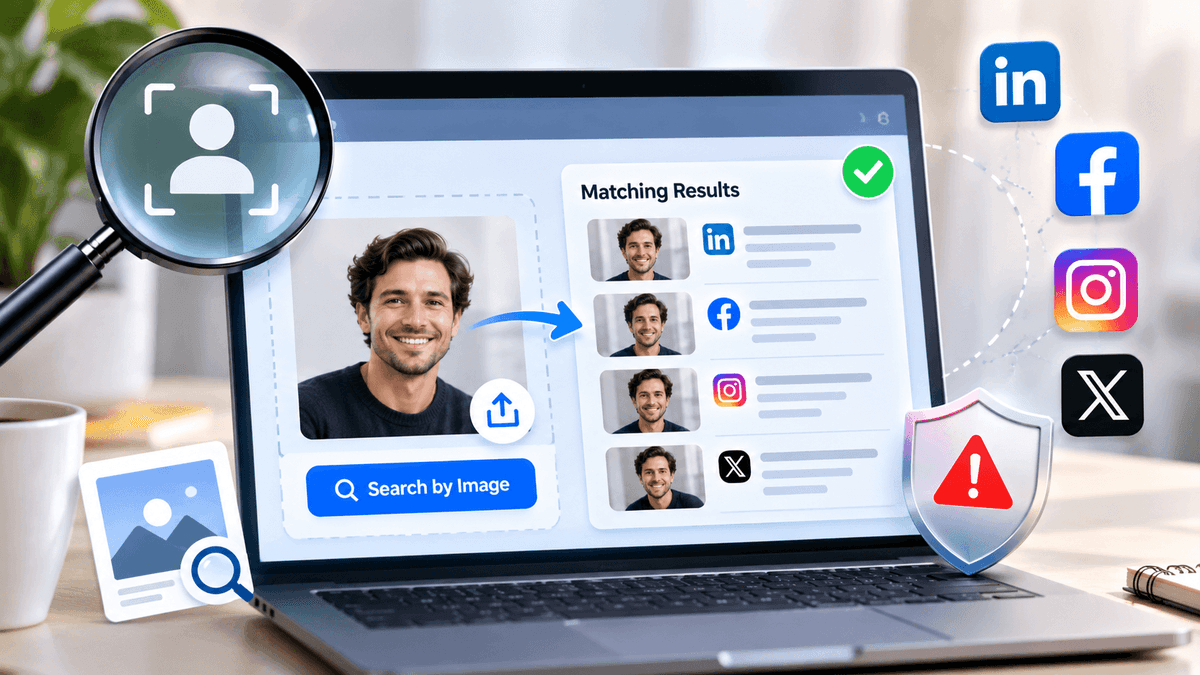
Suppose someone sends you a friend request.
Their profile looks convincing, the photo seems genuine, and their bio tells a believable story.
But something catches your attention. Haven't you seen that picture somewhere before?
Instead of guessing, you decide to search the photo.
A reverse image search can help you discover whether that picture appears on other public websites, has been used under a different name, or is connected to a publicly indexed social media profile.
Sounds useful, right? But there's a catch.
Not every social media photo is searchable.
Private accounts, restricted content, and images missing from search indexes may never appear in the results.
And even when you find a match, it doesn't necessarily mean you've found the person behind the account.
There's another important distinction: finding the same photograph isn't the same as finding someone with a similar-looking face.
So, how do you search a social media profile picture, understand what the results actually mean, and avoid making the wrong assumptions?
In this guide, we'll walk through the process using CopyChecker AI Reverse Image Search, Google Lens, and TinEye.
From preparing your photograph to examining possible matches and checking their sources, you'll learn what to look for at every step.
But before getting into the steps, it's worth understanding how much a profile picture can actually reveal.
| Quick Answer - Can You Find Social Media Profiles by Photo? |
|---|
| Yes, sometimes. Reverse image search can uncover public webpages containing the same or a similar profile picture, including some indexed social media profiles. However, it cannot access private accounts, search every platform, or confirm someone's identity. Any promising match needs verification through independent, credible public evidence. |
It's also important to approach these searches responsibly.
Only upload photographs you have the right to use, and limit face searches to yourself or someone who has explicitly consented.
A visual match should never be treated as proof of identity or fraud.
With those boundaries in mind, let's look at why some social media photographs are easy to discover while others remain invisible to image-search tools.
Can Reverse Image Search Find Social Media Profiles?
It can, but the account or photograph needs to be discoverable.
Let's say a graphic designer uses the same headshot on LinkedIn, a personal portfolio, and an online interview.
A reverse image search could uncover several of those pages because the photograph appears publicly.
Now consider someone using a unique picture on a private Instagram account.
Even if you upload the exact photograph, the search might return nothing.
Why?
Image-search providers rely on the images and webpages available in their indexes.
Social networks can limit what search engines access through privacy settings, login requirements, crawling restrictions, and website design.
And just because a profile is public doesn't mean every photograph on it has been indexed.
Here's what you can reasonably expect.
| What You Want to Find | Is It Possible? | What to Know |
|---|---|---|
| The same public profile photo | Sometimes | The image must be available in the search index |
| Cropped or edited copies | Sometimes | Some tools recognize altered photographs |
| A stock-photo source | Often, if indexed | Search results may lead to stock libraries |
| A public Instagram, Facebook, or LinkedIn profile | Sometimes | Visibility and indexing vary |
| A private social media account | No | Search tools cannot bypass privacy restrictions |
| Every account belonging to one person | No | No search index provides complete coverage |
| A different photo of the same consenting person | Sometimes | Face search may return candidates, including false matches |
| Proof that a profile is fake | No | Additional evidence is necessary |
| Public copies of your own photograph | Sometimes | Results depend on where the picture appears |
| Deleted photographs | Rarely | Publicly archived or reposted copies may remain |
The difference becomes easier to understand when you see how public and private profiles are treated during an image search.
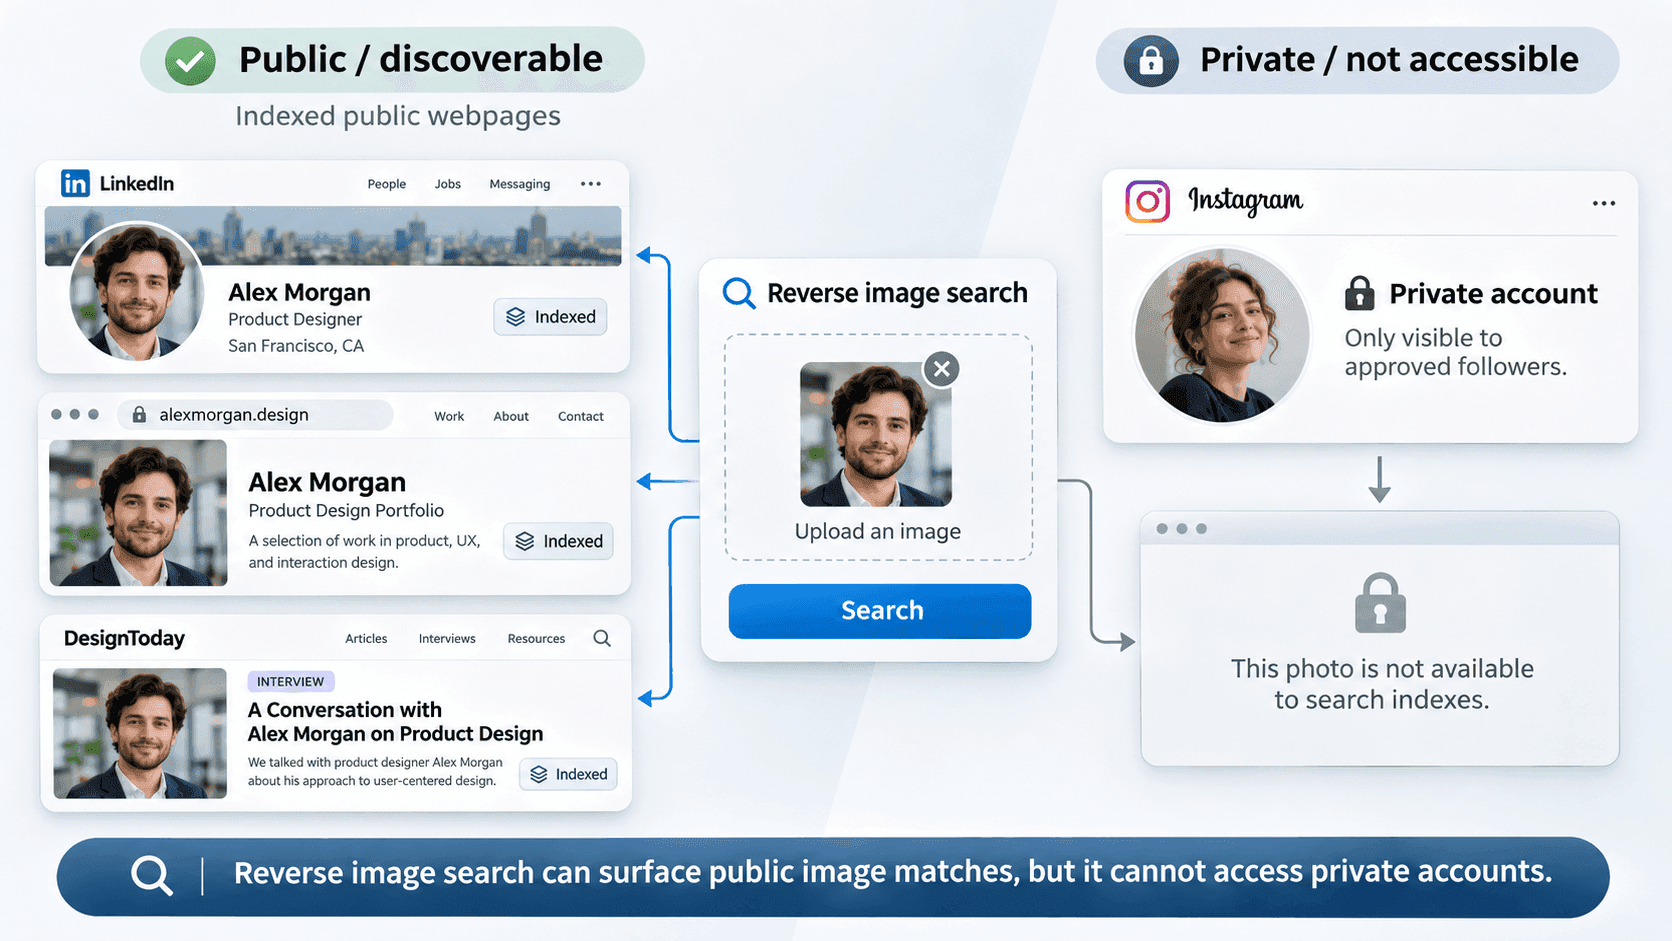
Figure 1: An illustration showing how a publicly available profile photograph may lead to indexed webpages, while a private social media account remains inaccessible to reverse image search.
Notice that the public photograph can potentially lead to several webpages, while the private account remains restricted.
Even when a public match appears, it only tells you where the image was found, not who owns or controls the profile.
That raises another question -
What Happens When You Search a Social Media Profile Photo?
Unlike a traditional search that begins with keywords, reverse image search starts by analyzing the photograph itself.
When you upload a photograph, an image-matching system analyzes visual characteristics and compares them with images available in its index.
Different providers use different technologies, but image comparison can involve distinctive shapes, patterns, colors, composition, and digital image representations.
Depending on the tool, the results might include:
- Exact Matches: The identical photograph appears on another webpage.
- Modified Copies: The original photograph has been cropped, resized, compressed, recolored, or otherwise edited.
- Visually Similar Images: Different photographs share some visual characteristics.
- Face-related Candidates: A specialized face-search tool identifies photographs containing comparable facial features.
- Source Webpages: Public pages associated with the returned images.
For instance, suppose you search for a profile picture showing someone wearing a blue jacket in front of a brick wall.
The results might show the same photograph on a business directory, a cropped version in an article, and another portrait with a similar background.
Those results are not equally meaningful.
The first two could establish that the photograph has been reused. The third might simply be a visually related picture.
This is why reviewing the actual source matters more than counting how many results appear.
Useful Tip: Open the webpage associated with a matching image, not just its thumbnail. A photograph may appear in a misleading preview while the original webpage explains its legitimate context.
And this brings us to one of the most important distinctions you'll need to make when reviewing your results: Is it actually the same photograph, or just someone who looks similar?
So let’s get into it -
Difference Between Exact Photo Match vs. Similar Face
Imagine you're checking whether someone has reused your professional headshot.
You upload your photograph and discover it on a public directory.
Your hairstyle, clothing, expression, and background match perfectly.
That's an exact-photo match, even if the image has been cropped.
Now imagine another result showing someone with a similar hairstyle, face shape, and smile, but wearing different clothes in an entirely different setting.
That is a possible facial resemblance, not proof that both photographs show you.
| Exact-Photo Match | Similar-Face Result |
|---|---|
| Shows the same photograph | May show a different photograph |
| Helps investigate image reuse | May support consented photo discovery |
| Background, clothing, and pose often match | Background, clothing, and pose may differ |
| Can help locate source webpages | Requires especially careful verification |
| Does not establish account ownership | Does not establish identity |
Why does this distinction matter?
Two unrelated people can look remarkably alike.
Camera angles, filters, age, and lighting can make that resemblance stronger or weaker.
Even when the result appears convincing, automated facial similarity is not a substitute for independent identity evidence.
 Figure 2: The original profile photograph is compared with an exact copy and a different photograph showing a similar-looking face. Only the exact match establishes that the same image has been reused; neither result proves identity or account ownership.
Notice how the exact match preserves the original photograph's details, while the similar-face result only shares certain facial characteristics.
So, why is this distinction important?
Two unrelated people can look remarkably alike.
Camera angles, filters, age, and lighting can make that resemblance stronger or weaker.
Even when a result appears convincing, automated facial similarity isn't a substitute for independent identity evidence.
Now that you know what different image matches can reveal, the next step is putting that knowledge into practice.
We'll start with the profile photograph itself, prepare it for searching, and then work through the tools to see what kinds of results they return.
Let’s get into the most anticipated part of the blog -
How to Reverse Image Search a Social Media Profile Photo
The process is straightforward.
Honestly, the important part is choosing the appropriate search method and knowing how to interpret what comes back.
For this workflow, start with image matching.
Use face search only when searching your own photographs or those of someone who has explicitly consented.
Step 1: Prepare the Profile Picture for Searching
Before uploading a profile picture, make sure you're using a clear image.
After all, the quality of your search can depend on what the tool is able to recognize.
A blurry screenshot filled with profile buttons, captions, and unrelated images may produce less relevant results than a clean photograph.
Start by saving the highest-quality version you're authorized to use.
For a more thorough search, prepare two versions of the photograph.
Copy A: The Complete Profile Photograph
Keep the original image intact, including the person's clothing, background, and other distinctive details. These elements may help the search tool recognize the photograph elsewhere.
Copy B: A Carefully Cropped Version
Remove unnecessary borders, social media interface elements, and unrelated objects while keeping the main subject clearly visible.
But why prepare both versions?
Imagine the original photograph shows someone sitting in front of a colorful painting.
That painting could help an image-search tool recognize another copy of the photograph.
If you crop too closely around the face, you might remove that useful clue.
On the other hand, if the image comes from a cluttered social media screenshot, cropping can help the tool focus on the photograph rather than surrounding distractions.
The comparison below shows how the same picture can look when kept intact, captured within a cluttered screenshot, or cropped for searching.
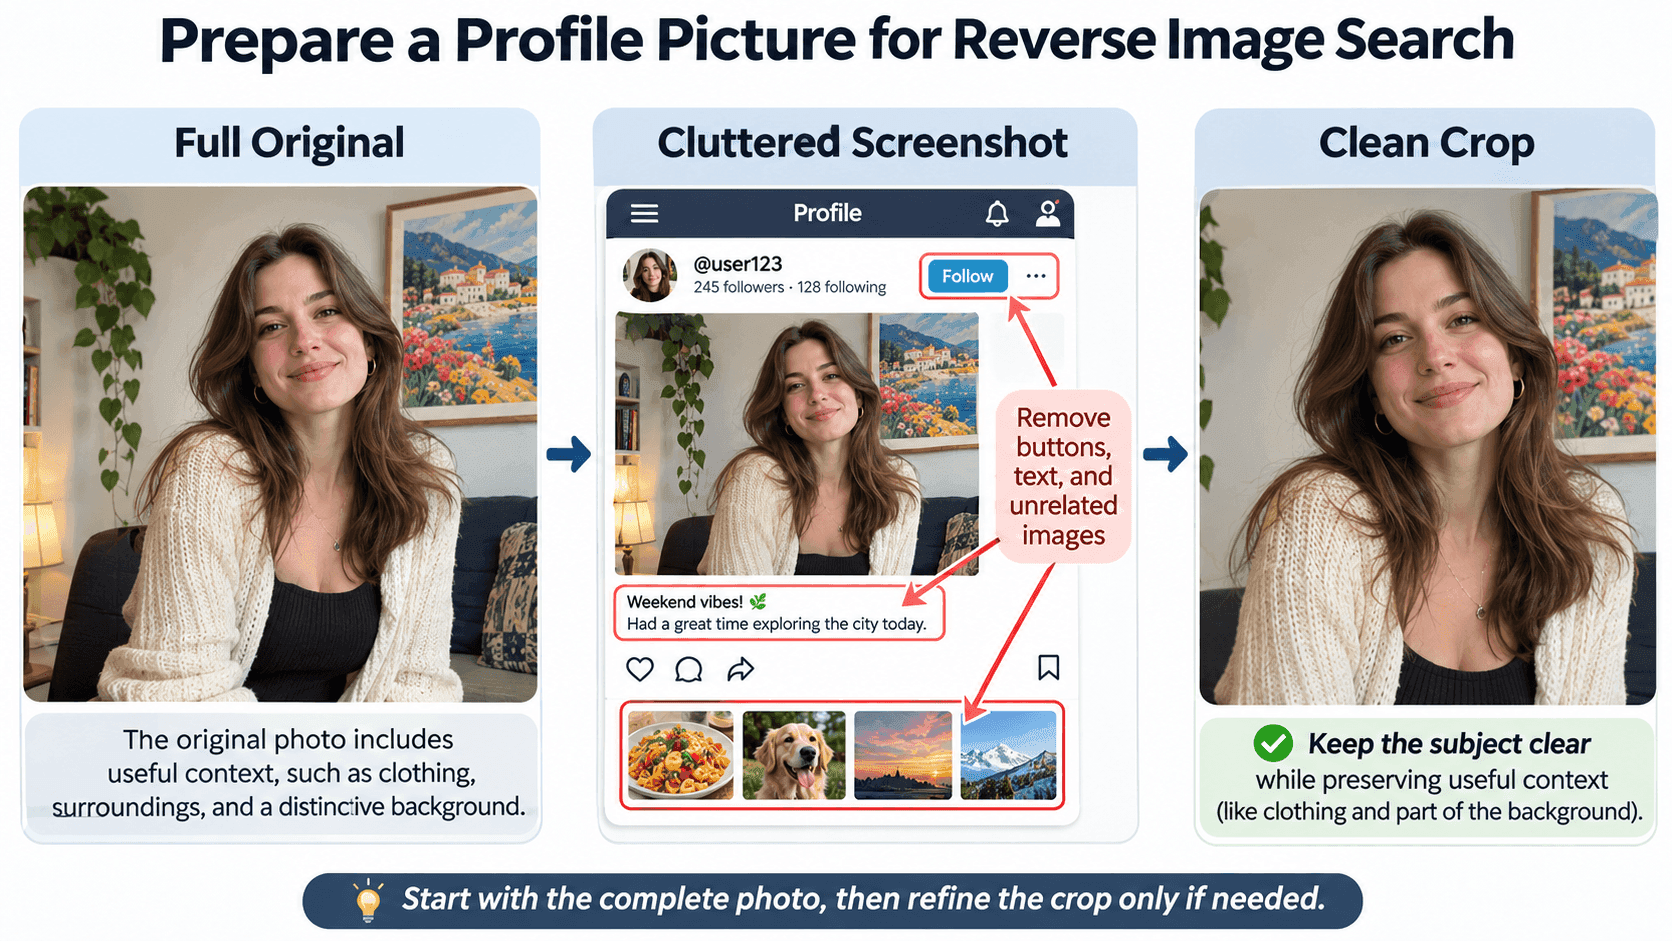
Figure 3: Three versions of the same profile photograph showing the complete original image, a screenshot with unnecessary interface elements, and a clean crop that keeps the main subject visible.
Notice that the full photograph preserves the surrounding details, while the clean crop removes distractions without changing the person's appearance.
One thing to avoid is using AI face enhancement or restoration tools to reconstruct missing details.
These changes can alter facial features and make comparisons less reliable.
Before moving on, save the public profile URL, visible username, and date you viewed the image. Having these details handy will make it easier to revisit a result or document a possible match later.
Image Preparation Tip: Start with the complete photograph. If the results are too broad or irrelevant, try the clean crop rather than removing all background details immediately.
Now that you have both versions ready, it's time to put them to the test and see whether the photograph appears anywhere else online.
Step 2: Search With CopyChecker AI Reverse Image Search
Now that you've prepared the profile photograph, let's see whether it appears anywhere else online.
We'll start with CopyChecker AI Reverse Image Search, which lets you search using an uploaded photograph or a publicly accessible image URL.
Depending on what's available in its search results, you may discover duplicate photographs, visually similar images, or webpages associated with them.
Here's how to get started:
- Open CopyChecker AI Reverse Image Search.
- Upload the prepared photograph, drag and drop the file, or paste a publicly accessible image URL.
- Review the consent requirement and proceed only when you're authorized to search the picture.
- Click Search with AI to start the search.
- Examine duplicate and similar-image results separately.
- Open relevant source links to see where the images appear publicly.
- Compare the original photograph with each promising result.
CopyChecker supports JPG, PNG, WebP, and GIF image formats.
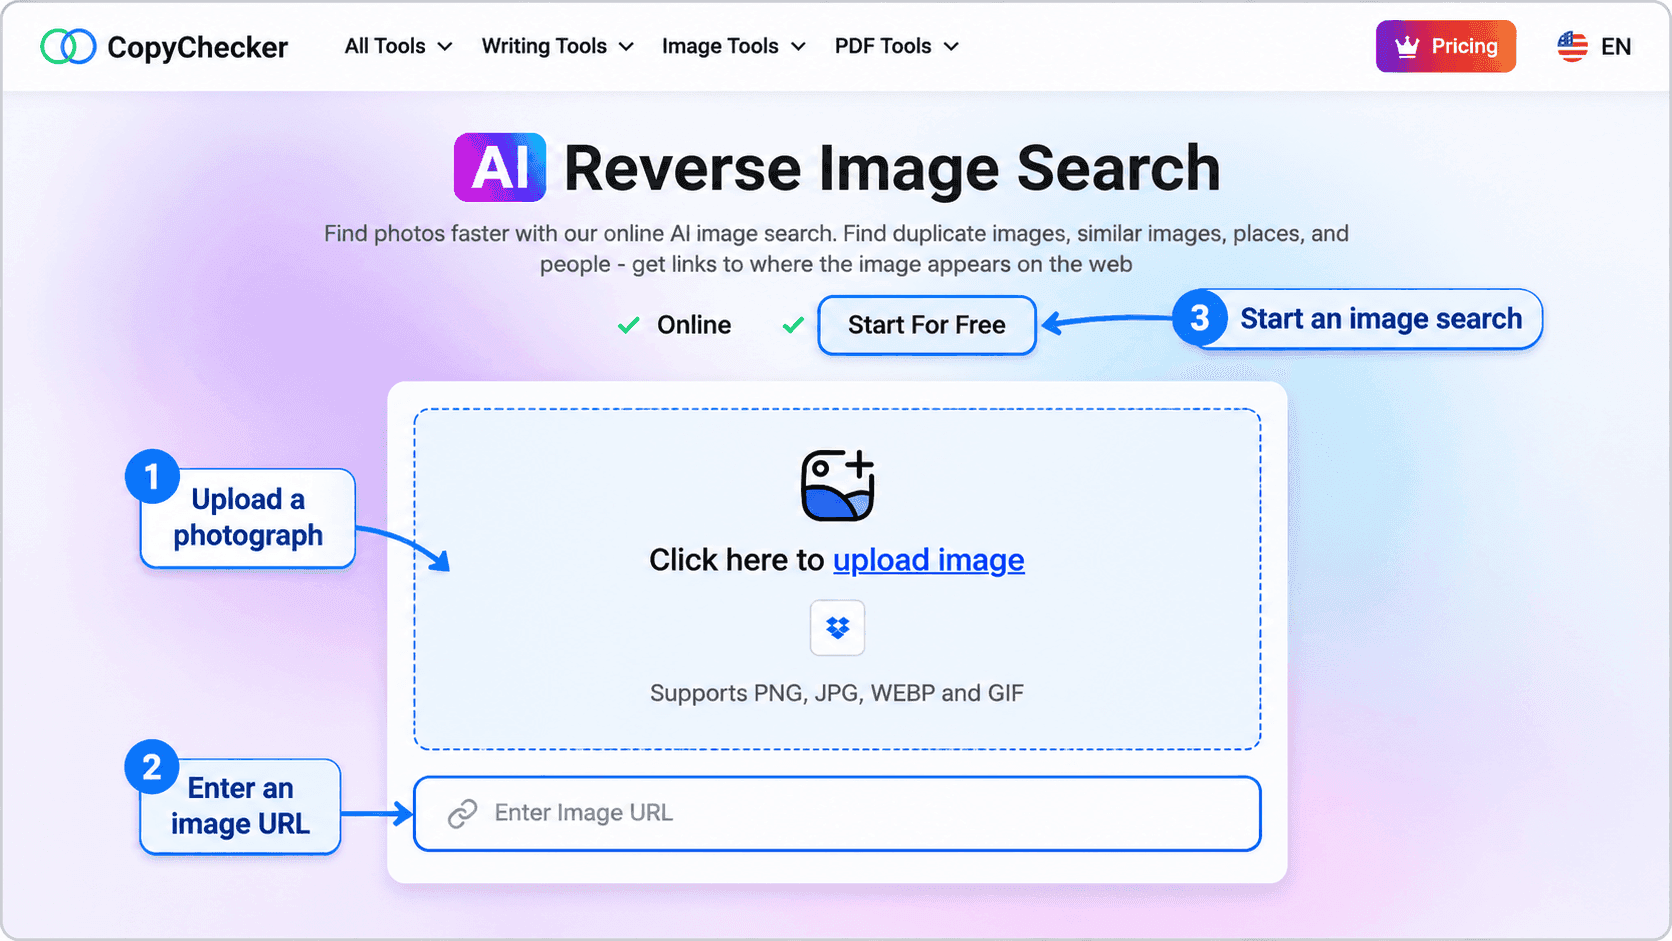
Figure 4: The CopyChecker AI Reverse Image Search interface, showing where to upload a photograph, enter an image URL, and start an image search.
Once the search is complete, you'll likely have several images or result categories to explore.
But don't rush to open everything.
What Should You Look for in the Results?
Start with the Duplicate Images section to check whether the tool found another appearance of the same photograph.
Then move to Similar Images to explore photographs that share visual characteristics with your uploaded picture.
For example, a result showing the same clothing, background, pose, and facial expression may be more relevant to image reuse than a completely different portrait featuring someone with similar facial characteristics.
If a promising result includes a public source link, open the webpage and examine its context.
As you review the results, ask yourself:
- Is this the exact same photograph or just a similar-looking image?
- Has the photograph been cropped, resized, or edited?
- Does the webpage mention a photographer or image credit?
- Is the photograph associated with a different public name?
- Does the surrounding content explain why the picture appears there?
Suppose you discover the photograph on an established photographer's portfolio.
That could give you a useful lead about its source.
But if it appears on an anonymous website that frequently republishes images, you may have found another copy rather than the original.
To understand why these distinctions matter, let's look at what happened when we tested CopyChecker ourselves.
What Did CopyChecker Find in Our Test?
For this example, we uploaded a newly AI-generated portrait of a woman wearing a cream sweater to CopyChecker AI Reverse Image Search.
We wanted to see whether the tool would find an existing copy of the photograph or return other visually related images.
The results showed an interesting difference.
The Duplicate Images tab displayed "No Results Found," while the Similar Images section returned several photographs featuring comparable hairstyles, poses, and indoor backgrounds.
In other words, CopyChecker found visual similarities but did not return an exact duplicate of our uploaded photograph.
Since the test portrait was newly generated, finding no indexed duplicates wasn't unexpected.
The following screenshot compares the two result categories from our test.
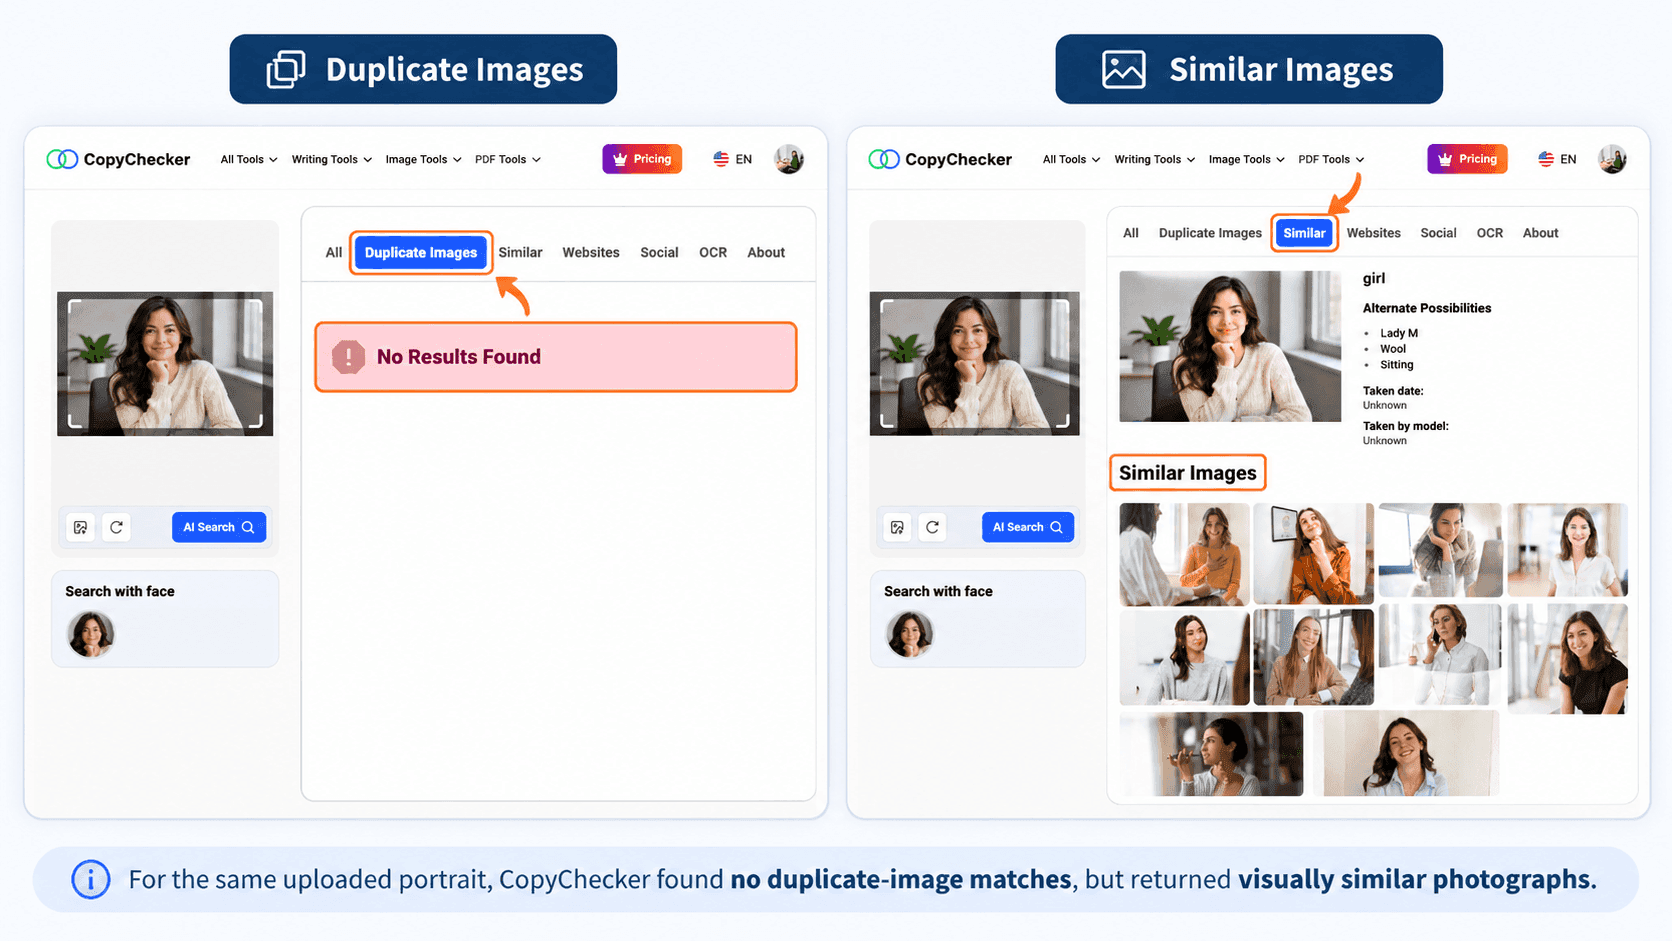
Figure 5: Results from our CopyChecker test showing no duplicate-image matches alongside visually similar photographs returned for the same AI-generated portrait.
Notice how the two sections answer different questions.
The Duplicate Images result tells us that CopyChecker did not find a matching copy in the results available for this search.
The Similar Images section, meanwhile, shows photographs with related visual characteristics.
Those results do not establish that the pictures show the same person or come from the same source.
What We Learned: Always examine duplicate and similar-image results separately. A visually similar photograph is not evidence that the original picture has been reused elsewhere.
There's also an important limitation to remember.
Even when an image search returns a convincing match, it cannot confirm who owns or controls the social media account displaying that photograph.
But what happens when the same person uses completely different photographs across public websites?
An exact-image search may not connect those pictures because they aren't copies of one another.
That's where face search offers a different approach, provided you're searching your own photographs or those of someone who has explicitly consented.
Step 3: Try CopyChecker Face Search When Appropriate
In our previous test, CopyChecker returned visually similar photographs but no exact duplicates.
But what if the same person appears in completely different photographs?
For example, you might use a formal headshot on your professional portfolio and a casual outdoor picture on another public website.
Since the clothing, background, and pose are different, a regular image search might not connect them.
This is where face search can offer another way to explore public photographs.
Unlike traditional image matching, CopyChecker's Face Search compares facial characteristics to find possible matches, even when the photographs differ.
However, this method should only be used with your own photographs or those of someone who has explicitly consented.
Here's how to try it:
- Choose a Clear Photograph: Use a well-lit, front-facing picture of yourself or a consenting person.
- Open CopyChecker Face Search: Visit the tool and upload your photograph.
- Start the Search: Run the search to look for possible facial matches.
- Review the Results: Examine the returned photographs and distinguish identical images from different-photo candidates.
- Check Public Sources: Open relevant source webpages, when available, to understand where the photographs appear.
- Verify Possible Matches: Compare the results with independent, credible evidence before concluding.
To see how this works, the following screenshot shows the uploaded portrait alongside the results returned by CopyChecker Face Search.
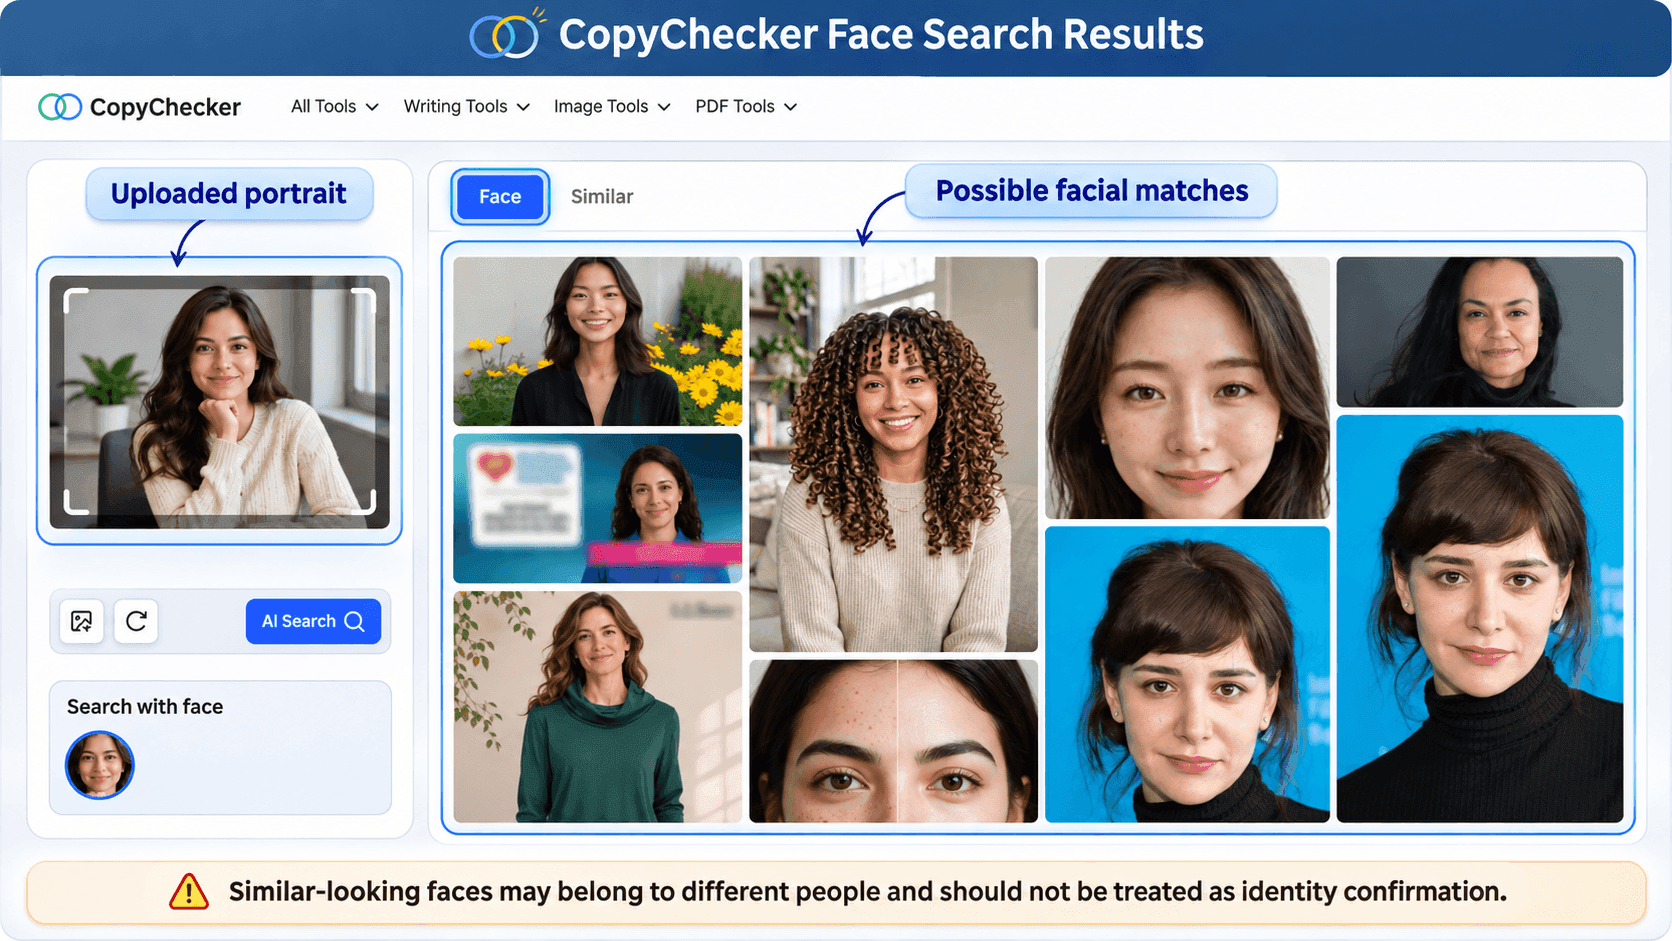
Figure 6: CopyChecker Face Search displays possible facial matches for an uploaded portrait. Similar-looking faces may belong to different people, so the results should not be treated as identity confirmation.
What if a Result Looks Similar but Isn't the Same Person?
That's entirely possible, and it's something worth watching for when reviewing the results.
Two unrelated people can share similar facial features.
Lighting, camera angles, age differences, filters, and image compression can also influence how closely photographs appear to match.
Imagine searching your own professional headshot and finding someone with a similar hairstyle, face shape, and smile.
At first glance, the result might look convincing.
But unless you recognize yourself or have reliable supporting evidence, you cannot assume the photograph shows you.
Face Search Tip: Look beyond facial resemblance. If a result includes a credible public source, examine its context and verify any possible connection independently. Don't contact or publicly identify someone based on similarity alone.
Face search can be useful when reviewing your own public digital footprint or helping someone who has explicitly agreed to the search.
It cannot reveal private accounts or reliably identify someone from appearance alone.
And since face-search results can sometimes be uncertain, it's useful to compare them with another image-search provider.
Next, let's try Google Lens and see how it can help us discover public webpages associated with a photograph.
Step 4: Search the Profile Picture With Google Lens
After exploring possible facial matches with CopyChecker, let's take another approach and see what Google Lens can tell us about the photograph.
Unlike a dedicated face-search tool, Google Lens focuses on finding visually related images, objects, and public webpages.
This makes it useful for exploring where a photograph or similar-looking images appear online.
For consistency, we'll use the same AI-generated portrait from our previous tests.
Here's how to search a profile picture with Google Lens
- Visit Google Images on your computer.
- Click the camera-shaped Search by image icon.
- Upload your prepared photograph or paste its publicly accessible image URL.
- Review the results, including Exact matches and Visual matches, where available.
- Adjust the image selection if Google Lens focuses on the wrong part of your photograph.
- Open relevant public webpages to examine the images and their surrounding information.
You can also perform a search on your phone using the Google app or a supported browser.
On Android, for example, you can touch and hold an image in Chrome and select Search image with Google Lens.
But what happens when you actually run the search?
What Did Google Lens Find in Our Test?
We uploaded the same AI-generated portrait of a woman wearing a cream-colored sweater that we previously searched using CopyChecker.
Google Lens displayed an AI-generated description of the photograph and several visually related images.
The results included photographs of other women wearing similar cream-colored sweaters, along with links to publicly accessible webpages, including image websites and social media content.
However, these results were based on visual similarities, not confirmed matches of the same person or photograph.
The screenshot below shows what Google Lens returned for our uploaded portrait.
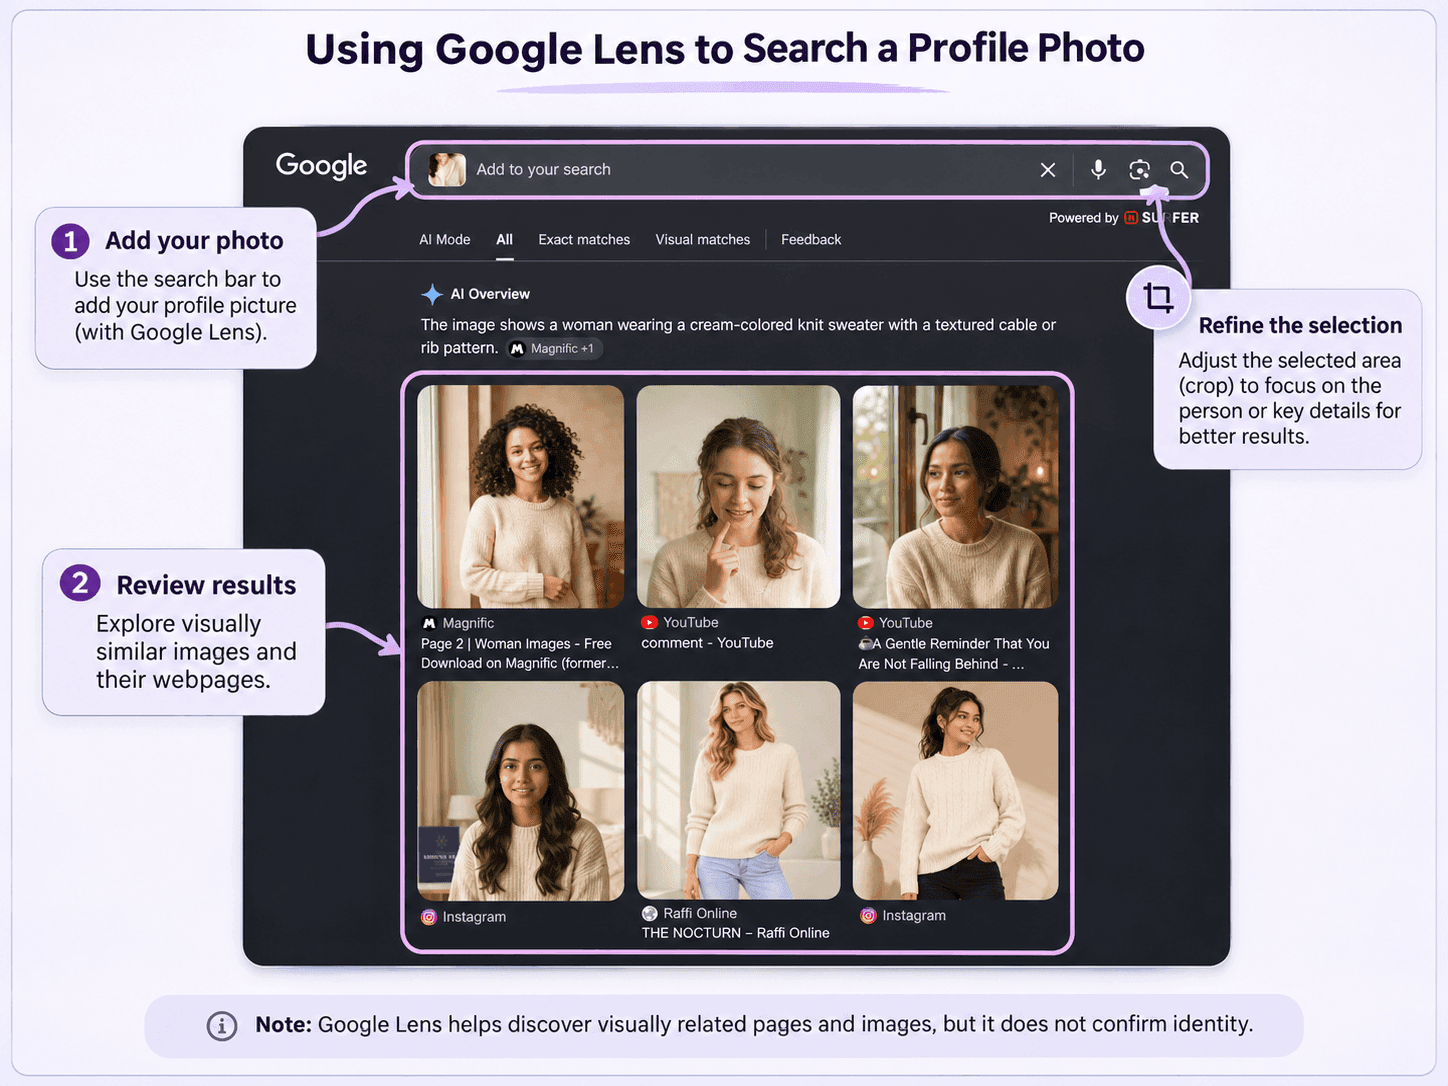
Figure 7: Google Lens displayed visually similar photographs and associated public webpages for our AI-generated test portrait. The results shared characteristics such as clothing and composition but did not establish an exact-photo match or confirm identity.
Notice how several results feature women wearing similar sweaters, even though their faces, poses, and backgrounds differ.
This is a useful reminder that Google Lens may prioritize visual details beyond someone's face.
A matching clothing style or background doesn't necessarily mean the photograph is connected to the same person.
How Can You Improve the Search Results?
Suppose your profile screenshot includes a colorful logo, several interface elements, or an unusual background.
Google Lens might focus on those details instead of the person you intended to search.
If that happens, try adjusting the selected image area.
For example, cropping out unrelated objects while keeping the main subject visible may produce more relevant visual matches.
You can also refine the search using a publicly visible username or organization name when that information is already known and relevant.
Google Lens Tip: Start with the complete photograph, then adjust the selection only if the results seem unrelated. Compare the image details and open relevant public source pages rather than relying on thumbnails alone.
Keep in mind that Google Lens is a visual discovery tool.
It cannot reliably identify private individuals or reveal accounts hidden behind social media privacy settings.
So far, we've explored image matching, face-based candidates, and broader visual search results.
But there's still one situation worth checking: What if someone has reused the same photograph after cropping, resizing, or editing it?
That's where TinEye can be particularly useful.
Step 5: Use TinEye to Find Edited or Reused Profile Pictures
So far, we've looked at image matching, face-based results, and broader visual search.
But what if the same photograph has been reused in a slightly altered form?
For example, someone might crop the image, resize it, or reuse a smaller version on another webpage.
In that situation, TinEye can be especially helpful.
Unlike tools designed for broader visual discovery, TinEye focuses on finding the same image and modified copies of it across indexed webpages.
Here's how to use it:
- Open TinEye.
- Upload your authorized photograph or paste its image URL.
- Review the matching results.
- Use the sorting menu to compare results in different ways.
- Select Most Changed if you want to look for more heavily modified versions.
- Select Oldest if you want to see earlier appearances TinEye discovered.
- Open relevant result pages and examine where and how the image appears.
To test this, we uploaded a licensed demonstration portrait to TinEye.
What Did TinEye Find in Our Test?
TinEye returned 5 results for the uploaded image.
The matches included resized versions of the same portrait appearing on public webpages, with filenames such as 300 × 300, 768 × 768, and 1024 × 1024 versions.
This is exactly the kind of result TinEye is useful for: showing that the same image may appear online in different sizes or formats, even when it has been modified slightly.
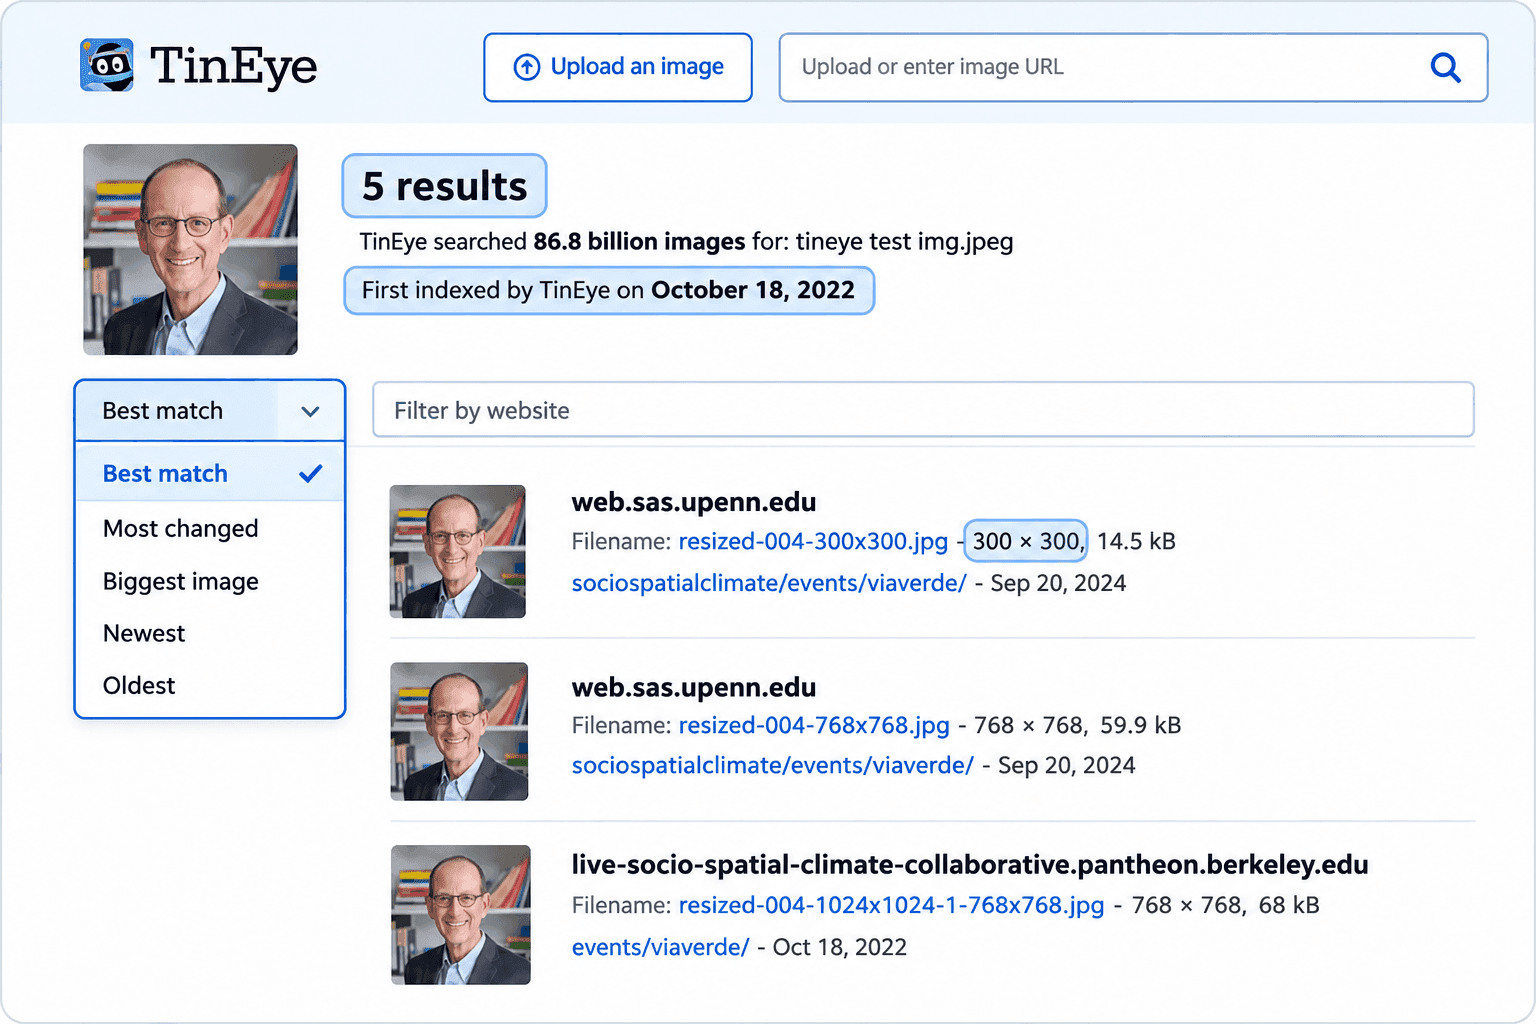
Figure 8: TinEye results for a demonstration portrait, showing multiple resized versions of the same image, the sorting menu, and public source-page links.
Notice what TinEye helps us confirm here: the image has been reused in several versions across indexed webpages.
At the same time, TinEye is not identifying a person across different photographs. It is matching the same image and altered copies of it.
Does the Oldest Result Show the Original Source?
Not necessarily.
TinEye's Oldest option refers to the earliest time TinEye discovered a copy of the image.
That does not guarantee the page is the image's original publication source.
For example, a website may have published the photograph before TinEye first indexed it, or the real original may exist on another page TinEye did not discover first.
So while the Oldest filter can provide a helpful clue, it should not be treated as final proof of where the image first appeared.
It's also important to remember that TinEye does not perform facial recognition.
It won't help you find different photographs of the same person.
Instead, it helps you trace the reuse of the same picture, including cropped, resized, or lightly edited copies.
If your goal is to investigate where an image may have first appeared, use TinEye as one clue and then check image credits, source pages, and other public evidence.
Our guide on how to find the original source of an image explains that process in more detail.
TinEye Tip: Use TinEye when you suspect a profile picture has been reused in the same or slightly modified form. If you're trying to find visually similar photographs or different photos of the same person, one of the earlier methods in this guide is usually a better fit.
Now that we've tried all four approaches, you might be wondering whether you really need to repeat every search whenever you're checking a profile picture.
Not necessarily.
Each tool serves a slightly different purpose, and knowing which one to start with can save you time.
Let's compare them so you can choose the most useful method for your situation.
Which Tool Should You Use for Social Media Profile Verification?
You don't need to use every image-search tool for every situation.
Choose one based on what you're trying to discover.
| Your Goal | Tool to Start With | Main Limitation |
|---|---|---|
| Find public copies of a profile photo | CopyChecker AI Reverse Image Search | Only discovers available indexed results |
| Search several conventional image engines | CopyChecker Reverse Image Search | Different engines may return overlapping results |
| Find webpages associated with a photo | Google Lens | Does not reliably identify private individuals |
| Find cropped or edited image copies | TinEye | Does not recognize someone across different photographs |
| Review different public photos of yourself | CopyChecker Face Search | Similar-face candidates can be incorrect |
| Report an account impersonating you | The social media platform | Reports require platform review |
For instance, if you're checking whether a profile picture has been reused elsewhere, starting with CopyChecker AI Reverse Image Search makes sense.
If the photograph appears to have been cropped or resized, TinEye may help you find other versions.
And if you're looking for broader visual matches and their associated webpages, Google Lens offers another approach.
CopyChecker also has a reverse image search tool that lets you explore results from multiple image search engines.
The key isn't to run as many searches as possible.
It's to find relevant results that you can verify through credible public sources.
But knowing which tool to use is only half the process.
What happens when you actually find the same profile picture under two different names?
Does that mean someone has stolen the photograph, or could there be another explanation?
Let's walk through an example to understand how to interpret that situation without jumping to conclusions.
What If A Profile Photo Appears Under Two Different Names
Now that you know which image-search tools to use, let's look at a situation where finding a matching photo raises more questions than it answers.
Imagine receiving a message from a social media profile named Alex Morgan.
The account features a professional-looking headshot and claims to belong to a marketing consultant.
Everything seems normal until Alex asks you to pay a registration fee for a business opportunity.
Something feels off, so you decide to investigate the profile picture.
First, you search the photograph.
You discover a professional webpage displaying the exact same portrait, but the person is introduced as Daniel Carter, a business advisor.
Next, you examine the public information.
The webpage presents a professional background that differs from the social media profile's claims. You would need independent sources to establish whether that information is accurate.
Then, you compare what you've found.
The photograph is identical, but the names and professional descriptions don't match. Combined with the unexpected payment request, this gives you a reason to be cautious.
The illustration below shows how this situation might look.

Figure 9: A fictional example showing the same portrait under two different names. Image reuse and conflicting claims may justify further investigation, but they do not establish who operates the accounts.
So, does this mean Alex Morgan is a fake account?
Not necessarily. The photograph may have been reused without permission, the names could have legitimate explanations, or the public information might be inaccurate.
What you do know is that the same image appears in two different contexts, and the account is requesting money under questionable circumstances.
That's enough reason to avoid sending payment, preserve the relevant evidence, and report suspicious activity through the social platform.
The Lesson: Finding the same photo under different names is a warning sign worth investigating, not automatic proof of impersonation or fraud.
And that leads to an important follow-up question -
How Can You Check Whether a Profile Picture Is Stolen?
Finding a photograph elsewhere is only the beginning.
Pictures are reused for plenty of legitimate reasons.
Someone might license a stock photograph, publish a professional headshot on several websites, or have their portrait featured in an article.
To investigate possible misuse, work through the following checks.
Check the Most Credible Source First
Look for official company pages, original photographer portfolios, established publications, or stock-photo libraries.
A source containing a clear image credit and supporting context is generally more useful than a webpage that simply reposts the photograph.
Compare the Names and Biographies
Does the same portrait appear under unrelated names?
If so, examine the surrounding information.
Different names may suggest impersonation, but they can also reflect legitimate professional names, pseudonyms, outdated profiles, or incorrect attribution.
Review the Profile's Claims
Does the biography match what credible public sources say?
Pay attention to major inconsistencies in professional roles, organizations, or the circumstances in which the photograph was published.
Look at the Account's Behavior
Image evidence becomes more concerning when combined with suspicious behavior.
Examples include requests for money, pressure to move conversations away from the platform, requests for verification codes, or inconsistent explanations about the account's identity.
Preserve the Evidence
If you suspect misuse of your own photograph, save the public profile link, relevant screenshots, and source URLs.
Avoid reposting someone else's personal information in public accusations.
Useful Distinction: A reused image is not necessarily a stolen image. Unauthorized use, misleading representation, and identity impersonation are related but different issues.
For a broader account-level review, go through this guide on how to find fake profiles.
By following these checks, you can begin separating ordinary image reuse from situations that genuinely deserve closer attention.
But there's still one scenario that can be particularly confusing: What if the same profile photograph appears under two different names, yet both webpages seem legitimate?
That doesn't always have a suspicious explanation.
Let's look at the possibilities before deciding -
What Does It Mean if the Same Profile Photo Appears Under Different Names?
Seeing one photograph attached to multiple names can feel like a discovery that settles everything.
Usually, it doesn't.
Consider these possible explanations:
| Explanation | What It May Indicate |
|---|---|
| Impersonation | Someone may be using another person's likeness to misrepresent themselves |
| Licensed stock photography | Several people or businesses may legally use the same photo |
| A repost or reupload | The image has been shared outside its original context |
| A stage or professional name | The same person may legitimately use more than one public name |
| Incorrect captioning | A website may have attached the wrong name |
| An outdated profile | Older information may no longer reflect current details |
The important question is whether the photograph's established context contradicts what the account claims.
For instance, a profile presenting a stock model's portrait as a personal selfie raises questions.
But a business using the same licensed image in an advertisement may be doing nothing wrong.
Now what about dating profiles and catfishing?
A catfish photo search can help identify possible image reuse, but it should not be treated as a standalone fraud test.
The US Federal Trade Commission recommends checking whether a romantic interest's photograph appears under another name or with inconsistent details.
The FTC also warns about people who avoid meeting in person and eventually ask for money.
If an account displays these behaviors, the concern goes beyond the photograph itself.
And remember, you don't need to identify the person behind a suspicious account before protecting yourself.
Stop sharing money or sensitive information, save the relevant evidence, and report suspected fraud through the appropriate platform.
By now, you've seen how one photograph can lead to several possible explanations, from legitimate reuse to potential impersonation.
But how do you decide which search results are actually trustworthy?
That's where verification becomes essential.
Rather than relying on one photograph or a single webpage, the next step is to compare the evidence, so let’s find out -
How to Verify a Possible Social Media Profile Match
By now, you've seen how the same photograph can appear across different websites, sometimes with conflicting names or information.
But finding a match is only the beginning.
The next step is determining whether the available evidence supports the connection you're considering.
Before making any assumptions, ask yourself what you're actually trying to verify.
Are you checking whether the same photograph has been reused?
Whether two public profiles belong to the same professional?
Or whether an account may be impersonating someone?
Each question requires different evidence.
And that's why you shouldn't rely on a single search result, no matter how convincing it looks
Use This Profile Verification Checklist
As you review the results from CopyChecker, Google Lens, or TinEye, work through these checks:
- The original and matching images are identical or clearly derived from the same photograph.
- The source webpage is publicly accessible and appears credible.
- At least one additional, independent, credible source supports the claimed connection.
- Relevant names, biographies, organizations, and timelines are consistent.
- The information hasn't simply been copied across several websites.
- No important contradiction remains unexplained.
- Your conclusion is supported by the evidence rather than facial resemblance alone.
But why does independent evidence matter so much?
Imagine discovering the same professional biography on three different websites.
At first, that might seem like strong confirmation.
However, if all three websites copied their information from the same inaccurate directory, you haven't actually found three independent sources.
Now consider finding an official company biography and a separately published professional interview that support the same connection.
That's more meaningful because the information comes from different sources.
Even then, it only supports the specific claims those sources establish.
It doesn't automatically prove who controls a particular social media account.
How to Record and Evaluate Your Findings
Once you've collected a few promising results, it's worth organizing them before deciding what they mean.
You don't need a complicated investigation report.
A simple table can help distinguish what you've actually discovered from what you're still trying to establish.
| Observation | Evidence | Appropriate Conclusion |
|---|---|---|
| The exact photograph appears on another public page | Matching image and public source URL | Image reuse found |
| Two independent sources support the same professional biography | Official website and independent publication | Public professional connection supported |
| Another face looks similar | Face-search candidate | Identity unverified |
| The profile requests payment and makes contradictory claims | Public profile content and other evidence | Suspicious behavior requiring caution |
| No matching images appear | Empty search results | No indexed match found |
So, how do all these checks fit together?
Think of verification as a process rather than a single search.
You first find an image match, examine the webpage where it appears, compare independent public information, and then decide what the available evidence actually supports.
The illustration below brings those steps together.
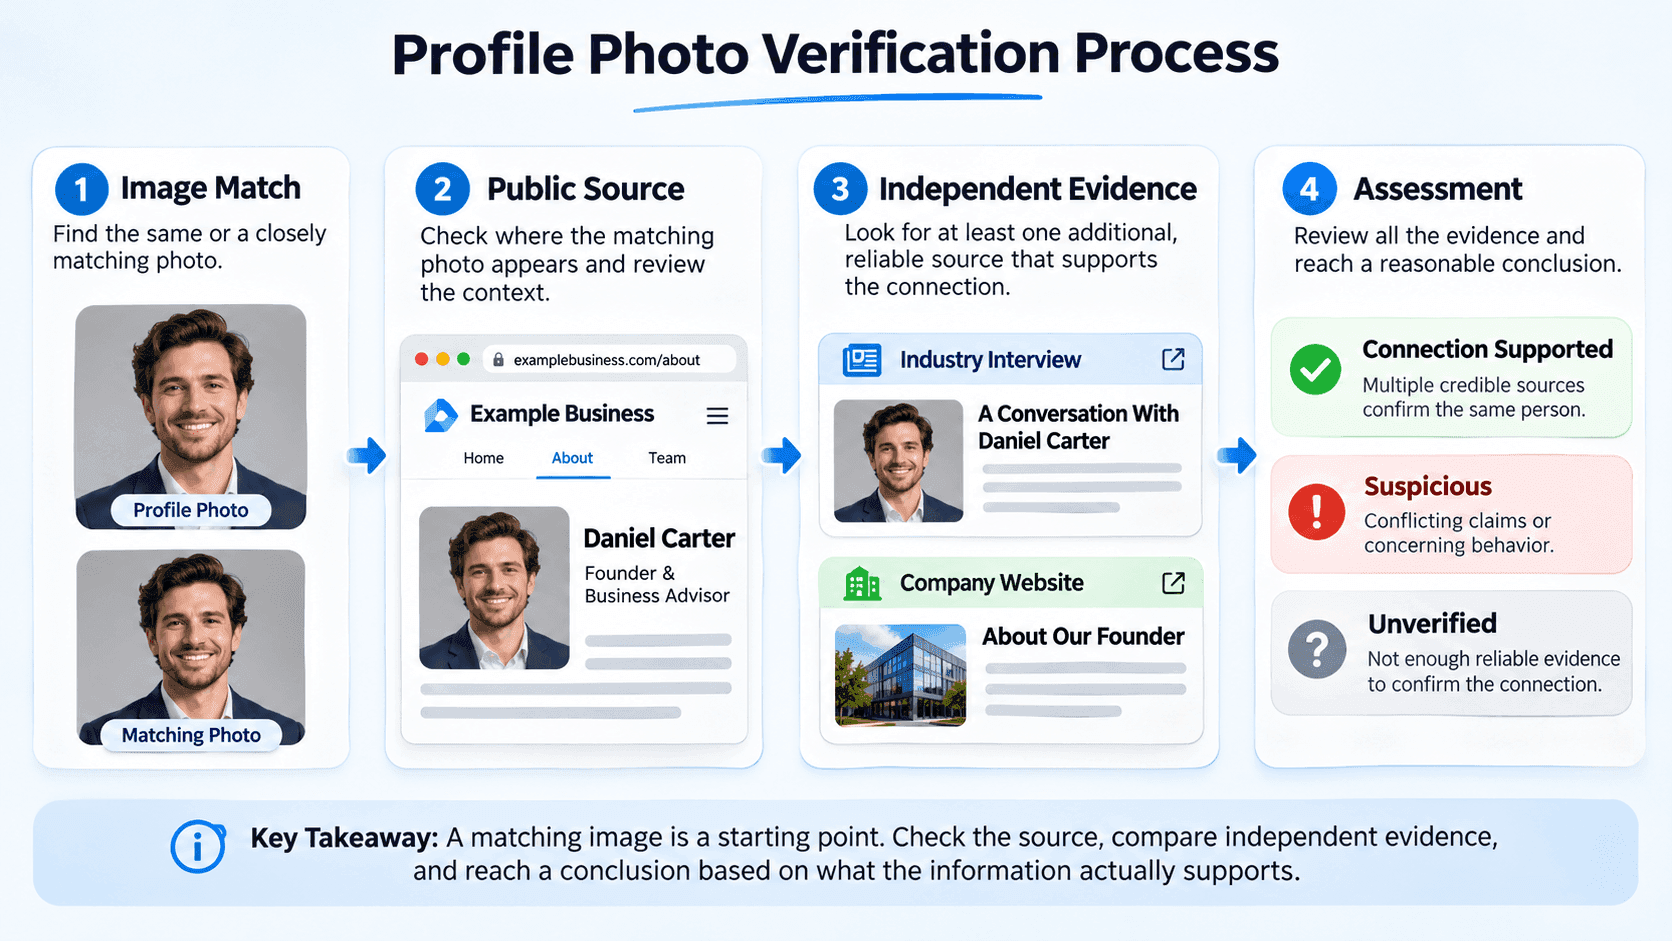
Figure 10: A four-step illustration showing how to evaluate a profile-photo match by checking its public source, reviewing independent evidence, and determining whether a connection is supported, suspicious, or still unverified. This is a fictional example, not a real identity-verification result.
Notice that the process doesn't always end with a confirmed connection.
Sometimes, you may establish that a photograph has been reused without knowing who controls the account displaying it.
Other times, the available information may contradict itself or simply provide too little evidence.
In those situations, "unverified" is a valid conclusion, not a failed investigation.
After all, the purpose of checking a profile isn't to force an answer. It's to understand what the evidence can reasonably tell you.
But what happens when your reverse image search doesn't return any useful matches at all?
That can happen even when the photograph has appeared somewhere else online.
Let's look at why.
Why Does Reverse Image Search Return No Results?
You've uploaded a clear profile picture, searched several times, and found nothing.
Does that mean the photo is original or the account is genuine?
No.
It only means the search provider did not return a relevant match from the sources available to it.
Here's how to interpret the most common situations.
| Possible Reason | What to Try |
|---|---|
| The account is private | Respect its privacy settings |
| The social platform limits indexing | Search other authorized public sources |
| The image was recently uploaded | Understand that indexing may be incomplete |
| The photograph has been deleted | Check legitimate publicly archived copies if appropriate |
| The image is very blurry | Try a clearer authorized version |
| The picture is heavily edited | Search the original version if available |
| The image is AI-generated | Understand that no older source photograph may exist |
| The provider doesn't have the image indexed | Try a different search engine |
| A crop removed important details | Retry with the complete photograph |
| The person uses entirely different photos elsewhere | Don't expect conventional image matching to connect them |
Fortunately, an unsuccessful first search doesn't always mean you've exhausted your options.
Try These Steps Before Giving Up
If your first search fails, use this short sequence.
- Start With the Original Photograph: Upload the clearest, complete version you have permission to use.
- Adjust the Crop: Remove unnecessary screenshot elements while preserving distinctive details that could help identify another copy.
- Try Another Search Provider: Different image-search engines have different indexes, so their results may vary.
- Check Relevant Public Sources: If a result looks promising, open its webpage and examine the surrounding context rather than relying on the thumbnail.
- Recognize When the Evidence Runs Out: If nothing credible supports a connection, leave the result unverified instead of making assumptions.
There's also one possibility that's becoming increasingly relevant: AI-generated profile pictures.
Remember the AI-generated portrait we used in our CopyChecker and Google Lens tests?
Because the image was newly generated, an identical photograph might not have existed in a search provider's index.
That helps explain why our CopyChecker test returned no duplicate-image matches.
An entirely synthetic portrait may have no earlier photograph to discover, although copies could appear if someone subsequently publishes or reuses it.
But here's the important part: a photo returning no results doesn't prove that the account is genuine or fake.
It simply means the search hasn't provided enough evidence to establish a connection.
And sometimes, that is where your investigation should end.
Remember: No indexed match doesn't mean no copy exists. It also doesn't establish whether the profile is authentic.
But what if the opposite happens?
Suppose your search does uncover the same photograph under conflicting names, and the account's behavior gives you reasons to suspect impersonation.
At that point, continuing to search may be less useful than taking steps to protect yourself or report the account.
Let's look at what you should do next.
What Should You Do if You Find a Fake or Impersonation Profile?
If you believe someone is misusing your photograph or impersonating another person, focus on protecting yourself and preserving evidence.
1. Stop Sharing Money or Sensitive Information
If the profile requests payments, passwords, verification codes, or personal documents, stop sharing them.
You can take precautions even before confirming whether the account is fraudulent.
2. Save the Relevant Evidence
Keep the public profile URL, account username, dated screenshots, and links to relevant image sources.
Avoid distributing another person's private information.
3. Report the Account to the Social Platform
Use the platform's official impersonation or fake-account reporting process.
On LinkedIn, for example, its published reporting instructions direct users to a profile's More → Report / Block options, where they can select the appropriate impersonation or fake-account reason.
On Facebook and Instagram, report the account through the platform's reporting controls and follow the official impersonation instructions.
4. Contact Your Bank if Money Was Sent
If you've already paid a suspected scammer, contact your bank or payment service promptly.
Ask whether the transaction can be stopped, disputed, or recovered.
5. Report Suspected Fraud
In the United States, suspected scams can be reported through the FTC's ReportFraud.gov service.
6. Avoid Confronting the Person in the Photograph
The individual pictured may have had their photograph stolen.
Don't publicly accuse them, threaten them, or encourage others to contact them.
Important: Reporting a suspicious profile is different from proving a crime. Provide accurate evidence and let the platform or appropriate authority assess the situation.
These steps can help you respond safely when a profile raises concerns.
But responsible image searching isn't just about what you do after finding a suspicious match.
It also matters how you search, whose photographs you use, and what you do with the information you discover.
Before wrapping up, let's look at the privacy and ethical boundaries that should guide every profile-photo search.
Privacy and Ethical Limits of Profile-Photo Searches
Finding a publicly available image doesn't mean every possible use of that image is appropriate.
There is a meaningful difference between checking whether your own photograph is being impersonated and attempting to uncover someone's private accounts without their consent.
Use image searches for legitimate verification, such as reviewing your own public photographs, checking suspected photo reuse, or assessing a publicly presented business profile.
Face searches should be limited to your own photographs or those of someone who has explicitly consented.
Avoid using these tools to bypass privacy settings, investigate minors without a legitimate safeguarding reason, monitor someone who has asked for no contact, or publish personal details.
Similarly, never treat a visual resemblance as legal or biometric proof.
A useful search should help you understand an image's public context, not expose someone to harassment or unwanted attention.
FAQs
Can Reverse Image Search Find Instagram Profiles?
Sometimes. Reverse image search may find publicly indexed Instagram photos or profiles, but it cannot access private accounts or guarantee results.
Can Reverse Image Search Find Facebook or LinkedIn Accounts?
Yes, if their profile photos appear on publicly indexed pages. However, matching photos do not prove the accounts belong to the same person.
Can Google Lens Find a Person's Social Media?
Google Lens may find public social media profiles containing the same or similar photos, but it cannot reliably identify someone or find every account.
Can Reverse Image Search Find Private Accounts?
No. Reverse image search cannot access private accounts or bypass privacy settings, even if the same photo appears publicly elsewhere.
How Do I Check Whether a Profile Picture Is Stolen?
Reverse search the photo and compare matches from credible websites, stock libraries, or portfolios. A duplicate alone does not prove theft.
What Does It Mean if a Profile Picture Appears Under Another Name?
It could indicate impersonation, stock-photo reuse, or incorrect attribution. Check credible sources before assuming the profile is fake.
Can Face Search Find a Different Photo of the Same Person?
Yes, face search may find different photos of a consenting person, but look-alikes and false matches require independent verification.
Why Does My Profile-Photo Search Show No Results?
The photo may be private, new, edited, AI-generated, or missing from the search index. Try another tool, but don't assume the account is genuine.
Does a Matching Image Prove That a Profile Is Fake?
No. Photos can be legitimately reused across websites and profiles. Additional credible evidence is needed to establish impersonation or fraud.
Final Thoughts
Reverse image search for social media profiles works best when you know exactly what you're trying to establish.
Are you checking whether a photograph has been reused?
Investigating a suspicious profile?
Reviewing your own public digital footprint?
Start with the image itself.
Examine matching photographs, visit credible source pages, and keep exact-image results separate from similar-face candidates.
CopyChecker's AI Reverse Image Search offers a practical starting point for investigating public image reuse.
Face Search can support consented searches for different photographs, but its results require independent verification.
Most importantly, remember that a matching picture is evidence of a visual connection, not automatic proof of identity or deception.
The goal isn't to find everything about someone. It's to understand what the available evidence actually tells you.